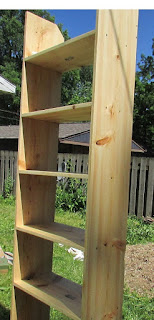
Phase One is done, at least. There are more things I'd like to do, but this replaces a small storage bench, jammed into a corner and piled with clothes.
It doesn't look too bad.
I spent the last three days assembling, sanding (and sanding....) and applying a finish (boiled linseed oil, hand-rubbed) to the shelves. The wood is inexpensive pine, with a lot of, shall we say, character--
But I like it.
Update
1 year ago


3 comments:
Nice job!
I am old enough that even No. 2 pine is only inexpensive when compared to any other grade of pine or any other species.
Lumber prices and the quality of materials are insane.
One of my first responsibilities as a carpenter's apprentice was to cull the lumber when it was delivered to the building site.
We returned approximately 10% of an order.
Today it would have been about 90% IF the lumber company even allowed such a thing.
I am sure this is in the same vein as the old Marines saying, "Back in my day..."
I have seen wood quality at big-box home-improvement stores be worse than it is now -- but I still have do a lot of digging and checking. If I wanted to pay more for better wood, buy a planer, etc., I could do prettier work but I enjoy the knots and small irregularities in this stuff. Filling and painting it would take away the character. I do my best to keep all my cuts and routing square and let the wood be what it is.
Forty years ago, when I built the very first version of the style of shelves I make now, I just went to a professional lumberyard and ordered boards cut to length! They were square, clean and knot-free. I used those shelves for over twenty-five years. Assembled without glue or routed grooves for the shelves and taken apart and put back together for moving a few times, the wood eventually wouldn't hold screws in the end grain. But I salvaged it and have used it in other shelves.
I, too, have spent a lot of time going through the pine at the big box stores. Sometimes I luck out and find a nice piece that does not fit my immediate needs, but it is so nice I buy it for a future project.
When I lived in Oregon the old house needed three odd sized doors replaced.
Alder was a relatively inexpensive local product.
So, I made them out of 8/4 alder that I planed down to 1 3/4, standard exterior door thickness, and hand chopped mortise and tenon joints of the frame and panel construction...old school.
My elbow hurt for weeks after.
The alder had a few oddly shaped knot holes, bark inclusions, and other natural imperfections that I filled with Bondo that I had tinted a dark brown.
I finished with a water based varnish.
The filled areas contrasted nicely with the natural alder and the "flaws"" in the wood enhanced the appearance of the doors.
It wasn't a wabi sabi thing, but the flaws did improve the end result.
They came out very nice.
Post a Comment